Why Your Dryer Vent Hose Demands Immediate Attention
Dryer vent hose repair is a critical home maintenance task that prevents house fires, saves money on energy bills, and extends your appliance’s lifespan. If you’re experiencing longer drying times, a hot dryer exterior, or a burning smell, your vent hose likely needs immediate attention.
Quick Answer: Common Dryer Vent Hose Problems & Solutions
- Small holes or tears – Temporarily patch with UL-listed foil tape
- Loose or disconnected sections – Reconnect and secure with hose clamps
- Crushed or kinked hose – Straighten if possible, or replace the damaged section
- Large tears (over 3 inches) – Full replacement required
- Brittle, cracked, or vinyl/plastic hose – Replace with semi-rigid metal ducting
According to the U.S. Fire Administration, approximately 2,900 clothes dryer fires are reported each year in the U.S., resulting in deaths, injuries, and $35 million in property loss. The leading cause is lint buildup in clogged or damaged dryer vents.
A damaged dryer vent hose is often overlooked until clothes take multiple cycles to dry or a burning smell appears. The flexible tube connecting your dryer to the outside is under constant stress from heat and movement, leading to cracks, tears, or disconnection.
Fortunately, many dryer vent hose repairs are straightforward DIY projects. This guide will walk you through every step, from temporary patches to full replacements. For Long Island homeowners, knowing when to repair versus replace isn’t just about efficiency—it’s about protecting your family from a preventable fire hazard.

Spotting the Danger: Signs Your Dryer Vent Hose Needs Repair
Your dryer vent hose carries hot, moist, lint-filled air safely outside. When it fails, the consequences go beyond damp laundry. Most problems develop gradually from wear and tear, accidental damage, or neglect.
The most common issues include:
- Lint buildup: Lint escapes your trap and accumulates in the hose, restricting airflow and creating a fire hazard.
- Visible damage: Tears, cracks, and holes allow hot air and lint to escape into your home.
- Kinks and sharp bends: These create bottlenecks that trap lint and moisture.
- Disconnected hose: This is a worst-case scenario, pumping hot, humid, lint-filled air directly into your walls or laundry room.
How do you know if your vent hose needs attention? Your dryer will give you clear warning signs:
- Longer drying times: If a load now takes two or three cycles, airflow is likely blocked.
- Dryer exterior is hot to the touch: This indicates that heat isn’t escaping properly through the vent.
- A burning smell: This is a critical warning that lint inside the vent or dryer is getting dangerously hot—a precursor to a fire.
- Excess humidity in the laundry room: You may see condensation on windows or feel dampness, which can lead to mold growth.
- Excess lint around the dryer: If you see lint on the floor or behind the machine, the hose is likely leaking.
- Visible damage: A quick look behind your dryer can reveal obvious cracks, holes, or crushed sections.

Why a Damaged Vent is a Hazard
A damaged dryer vent is an immediate and serious risk.
- Fire Risk: Lint is highly flammable. When a damaged or clogged hose traps heat, this lint can ignite. The U.S. Fire Administration reports that dryers cause approximately 2,900 home fires annually, with failure to clean being the leading cause. Proper dryer vent hose repair is a critical preventative measure.
- Carbon Monoxide Poisoning: With a gas dryer, a blocked vent can cause deadly, odorless carbon monoxide to back up into your home. This is a major concern for homes in Nassau and Suffolk County.
- Mold Growth: Escaping moisture creates the perfect environment for mold to grow in your walls and behind your dryer, posing a health risk.
- Wasted Energy & Appliance Strain: Your dryer works harder and runs longer, increasing utility bills and causing premature wear on its components, leading to costly repairs or early replacement.
Gearing Up: Essential Tools and Safety Precautions
Before starting any dryer vent hose repair, safety is paramount. Follow these essential precautions, whether you’re in Garden City NY or Freeport NY.
Safety First:
- Always unplug your dryer from its electrical outlet. For a gas dryer, also shut off the gas supply valve. This prevents electrocution and gas leaks.
- Wear a dust mask to avoid inhaling lint and debris.
- Use work gloves to protect your hands from sharp metal edges on hoses and clamps.
- Wear safety glasses to shield your eyes from flying dust and debris.
- Get help moving the dryer. These appliances are heavy, so lift with a partner to avoid injury.
Tools You’ll Need
Having the right tools makes the job much smoother. Gather these items before you begin:
- Screwdriver or nut driver for hose clamps.
- Pliers for gripping stubborn clamps or hoses.
- Utility knife or tin snips for cutting the vent hose.
- Flashlight or headlamp to see behind the dryer.
- Vacuum with a hose attachment for cleaning out lint.
- Measuring tape.
Materials for the Job
Using the correct materials is crucial for a safe, long-lasting repair.
- New Dryer Vent Hose: Choose a semi-rigid metal hose. Avoid flimsy plastic or foil-style hoses, as they are a fire hazard. Metal ducting is fire-resistant and provides better airflow.
- UL-Listed Foil Tape: Do not use standard duct tape. Its adhesive fails under the heat and moisture from a dryer. UL-listed aluminum foil tape is designed for high-temperature HVAC applications.
- Hose Clamps: Use metal clamps to secure the hose to the dryer and the wall vent. Ensure they are the correct size (typically 4-inch diameter).
DIY Dryer Vent Hose Repair: A Step-by-Step Guide
With your safety gear on and tools ready, you can now tackle your dryer vent hose.

First, access and disconnect the hose. Carefully pull your dryer away from the wall. Loosen the clamps at both ends—one on the dryer’s exhaust port and one on the wall vent—and remove the old hose. Before proceeding, use your vacuum to thoroughly clean all lint from the dryer’s port and the wall vent opening. A clean connection is essential.
How to Perform a Temporary Dryer Vent Hose Repair
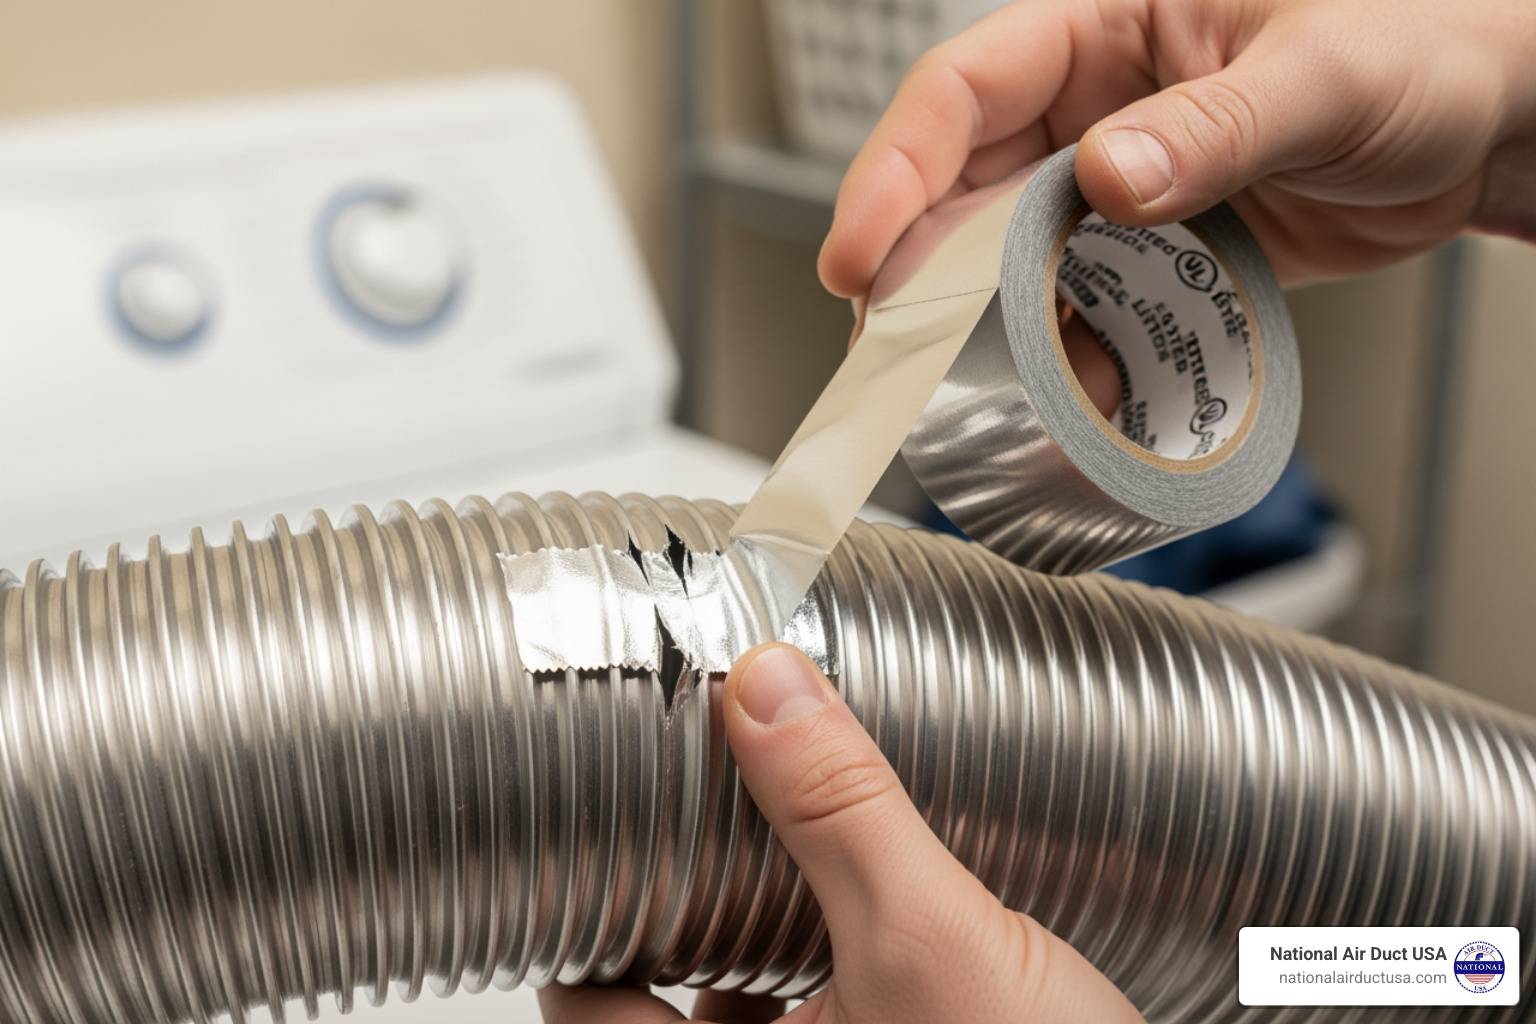
For small holes or minor tears (less than an inch), a temporary patch can provide a short-term fix until you can perform a full replacement.
- Clean the area around the damage with a damp cloth to remove all lint and dust. Let it dry completely.
- Apply UL-listed foil tape, cutting a piece that extends at least an inch beyond the tear on all sides. Press it down firmly to create an airtight seal.
- Check and tighten the hose clamps at both ends to ensure a secure connection.
This is a temporary solution. Plan to replace the hose soon for a permanent, safe repair.
Step-by-Step Guide to a Full Dryer Vent Hose Repair and Replacement
For large tears, crushed sections, or old, brittle hoses, a full replacement is the only safe option.
- Disconnect and remove the old hose as described above.
- Measure for the new hose. Check the distance from the dryer port to the wall vent. Add 6-12 inches for flexibility, but keep the hose as short and straight as possible to maximize airflow.
- Cut the new hose to length using tin snips or a utility knife.
- Attach to the dryer. Slide a hose clamp over the end of the new hose, fit the hose over the dryer’s exhaust port, and tighten the clamp securely.
- Attach to the wall vent. Route the hose with gentle curves, avoiding sharp kinks. Attach it to the wall vent using the same clamp method.
- Test the connection. Carefully push the dryer back, ensuring the hose doesn’t get crushed. Plug the dryer in (and turn on the gas, if applicable). Run an empty cycle for 10-15 minutes. Go outside and check that the exterior vent flap opens and warm air is flowing out. Check the indoor connections for any air leaks.

For a helpful visual guide, you can reference the Fast Fix Dryer Vent Hose Replacement guide. Following these steps ensures a safe dryer vent hose repair for your home in Hicksville NY or anywhere in Suffolk County.
Repair or Replace? Making the Right Call
So you’ve found a problem with your dryer vent hose. Now you must decide: repair or replace? This choice is critical for your home’s safety and your dryer’s efficiency.
| Scenario | When to Repair | When to Replace |
|---|---|---|
| Damage Type | Small punctures (less than 1 inch), minor tears, loose connections, slight kinks that can be straightened. | Large tears (over 3 inches), multiple holes, brittle or cracked material, crushed sections that cannot be reshaped. |
| Hose Material | Flexible foil (for minor temporary fixes, but replacement with metal is always better). | Plastic or vinyl accordion-style hoses (outdated, fire hazard), severely damaged flexible foil. |
| Age & Condition | Relatively new hose with minimal wear, otherwise in good condition. | Old, brittle, stiff, or heavily lint-laden hose; showing signs of degradation. |
| Lint Buildup | Minor lint buildup that can be easily cleaned. | Extensive, stubborn lint buildup that indicates structural issues or extreme neglect. |
| Overall Structural Integrity | Hose maintains its shape and connection points are strong. | Hose sags significantly, collapses easily, or connections are consistently failing. |
When to Repair
A dryer vent hose repair is appropriate only for minor issues. If you’ve caught a small puncture (under 1 inch) or a loose connection, a quick fix is often sufficient. A patch with UL-listed foil tape can seal a small hole, and tightening or replacing a clamp can fix a loose connection. Similarly, a minor kink can sometimes be gently straightened. However, view these repairs as temporary measures, especially on older foil hoses.
When to Replace
In most cases, replacement is the safest and most effective solution.
- Large tears (over 3 inches), brittle material, or crushed sections mean the hose’s integrity is compromised. A patch will not fix the underlying structural failure.
- If you have an outdated plastic or vinyl accordion-style hose, replace it immediately. These materials are not up to current safety codes and are a known fire hazard. This is a critical safety upgrade for any home on Long Island.
- If the hose has multiple damaged spots, it’s more practical and safer to replace the entire unit rather than creating a patchwork of repairs.
When in doubt, replace it. A new semi-rigid metal hose is an inexpensive investment in your family’s safety and your dryer’s performance.
Proactive Maintenance: Preventing Future Damage
You’ve successfully tackled your dryer vent hose repair or replacement—congratulations! The next step is proactive maintenance to prevent future issues. Regular attention to your dryer vent system protects your home from fire hazards and keeps energy bills down.
Regular Cleaning and Inspection
Simple habits are your first line of defense against lint buildup.
- Clean your lint trap after every single load. This is the single most effective way to prevent lint from entering your vent hose.
- Inspect the hose every six months. Pull the dryer out and visually check for any kinks, tears, or loose connections.
- Check the exterior vent cap. Ensure it opens freely and is not blocked by lint, nests, or other debris.
- Schedule professional cleaning at least once a year. Even with diligent cleaning, lint builds up in long or complex vent runs inside walls. Our NADCA-certified technicians use specialized tools to thoroughly clean the entire system, removing hidden fire risks. For households with heavy dryer use, consider this service every 6-8 months. Learn more on our services page.
Proper Installation Techniques
Correct installation is key to performance and longevity.
- Keep the hose short and straight. The most direct path from the dryer to the outside is best. Every bend and extra foot of length adds resistance and creates a place for lint to collect.
- Use gentle curves, not sharp bends. Avoid any angles sharper than 90 degrees.
- Secure connections properly. Use metal hose clamps to attach the hose to the dryer and the wall. Do not use duct tape or zip ties.
- Use rigid or semi-rigid metal ducting. This is the most important tip. Unlike flammable plastic or vinyl hoses, metal ducting is fire-resistant, provides a smooth interior for better airflow, and doesn’t sag or crush easily.
Following these guidelines will dramatically reduce the need for future repairs, keeping your dryer efficient and your home safe.
Frequently Asked Questions about Dryer Vent Repair
We’ve been serving homeowners across Long Island for years, and certain questions about dryer vent hose repair come up frequently. Here are the answers to the most common ones.
How often should a dryer vent hose be inspected and cleaned?
You should perform a visual inspection of the hose and exterior vent cap every 6 months. Look for damage, blockages, and ensure connections are tight. For a deep cleaning, we recommend professional service at least once a year. This removes hidden lint buildup deep within the vent line, which is a primary cause of dryer fires. If you have a large family or do laundry frequently, consider a professional cleaning every 6-8 months.
Can I use regular duct tape for a dryer vent hose repair?
No. Standard duct tape is not designed for the high heat and moisture produced by a dryer. The adhesive will quickly fail, causing the tape to peel off and create a leak for hot, lint-filled air—a serious fire hazard. You must use UL-listed aluminum foil tape, which is specifically designed for high-temperature HVAC applications.
When should I call a professional instead of doing it myself?
While many minor repairs are DIY-friendly, you should call a professional in these situations:
- The vent run is long or complex, with multiple turns or passages through walls and ceilings. Our technicians have specialized tools to steer and clean these systems.
- You suspect a blockage deep inside the wall that you cannot see or reach.
- You’re not comfortable performing the replacement. A poor installation can be as dangerous as a damaged hose.
- DIY fixes haven’t solved the problem. If your dryer is still inefficient or you smell burning, a professional can diagnose the underlying issue.
For complex issues or annual deep cleaning, trust the certified technicians at National Air Duct USA. We serve homeowners throughout Nassau and Suffolk Counties, ensuring your system is safe and efficient. Schedule one of our professional services for peace of mind.
Conclusion
We’ve covered how to spot warning signs, perform repairs, and decide between a patch and a full replacement. The most important takeaway is that your dryer vent hose is a critical safety component of your home.
Safety comes first. Using the right materials—like semi-rigid metal ducting and UL-listed foil tape—is a non-negotiable investment in your family’s safety and your dryer’s lifespan. Regular maintenance is your best defense against problems. Clean the lint trap after every load, inspect the hose every six months, and schedule an annual professional deep cleaning to prevent the vast majority of issues.
While many dryer vent hose repair tasks are manageable, some situations require an expert. If you face a complex vent run, a stubborn blockage, or simply aren’t comfortable with the work, professional help is the safest choice.
The NADCA-certified technicians at National Air Duct USA are ready to assist homeowners throughout Long Island, including Westbury NY, Hempstead NY, and across Nassau and Suffolk Counties. We have the tools and expertise to ensure your dryer vents safely and runs at peak efficiency. Don’t wait for a small issue to become a dangerous one. Get peace of mind by scheduling one of our professional services today.